The Building of Aslan
Using the Bird's Mouth Method
Updated 07/12/00
The Building of Aslan |
Using the Bird's Mouth Method Updated 07/12/00 |
|
|
|
|
|
|
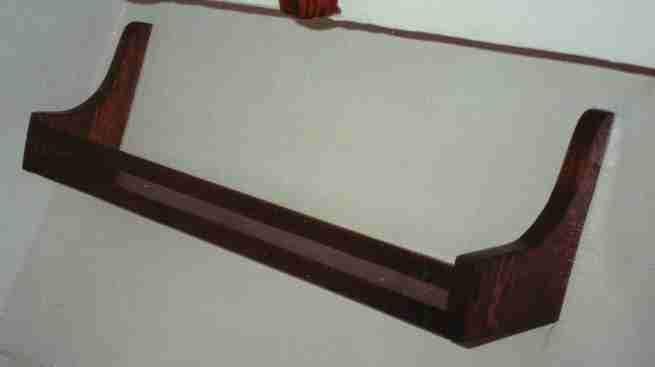 |
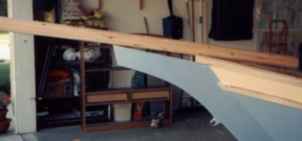
OK, OK . . . so this isn't a mast. The mast construction starts below. The Weekender plans call for a shelf inside the cabin with a turned-post railing to keep things on the shelf. I was going to leave it off, until I read the shelf is actually part of the hull-stiffening system. So I made two simplified shelves with a straight railing to satisfy both the plans and my desire to get on with the construction of the boat. And they turned out pretty nice. Cheap too. Now, on to the mast! |
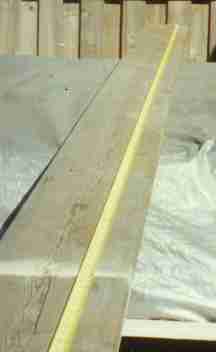 |
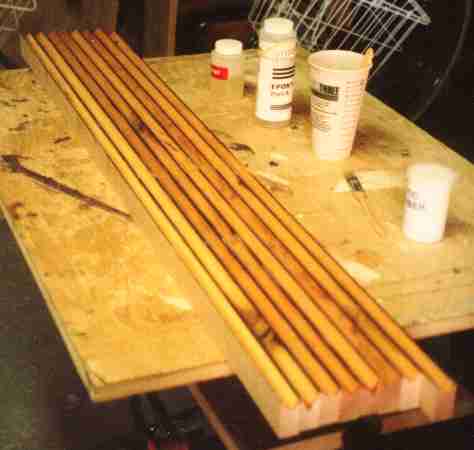
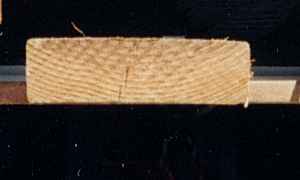
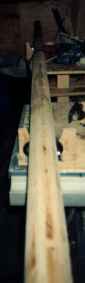
This 18' douglas fir 2 x 10 was in the garage when we moved in. It is from the original house construction 12 years ago, so I know its nice and dry! It has close grain, with some cracks and checking at one end. The Weekender mast is 15' 1" tall on the plans, hinged at 41" from the bottom. The plans call out for a 4 x 4 with a pair of gate hinges (one with a removeable pin) to make the mast fold down. I want to use the "Bird's Mouth Method" to make a round mast, which I think is more in keeping with the style of the Weekender. The calculations for making a mast call for 8 "staves" 1.4" wide and 3/4" thick to make a mast 3.75" in diameter (see the math at Tapered Bird's Mouth Hollow Mast Test.) The net dimensions on a 2 x 10 are about 1 1/2" x 9 1/2", so I thought I could make the entire mast out of this free plank by slicing off at least 8 good staves. |
 |
For the bottom portion, I only need 41", but because the end is checked and cracked, I used 51" of the plank. Here, the table saw is set up with the fence 3/4" away from the blade, and the blade is set to the "gullets" on it to clear the top of the wood. A table is positioned behind the table saw to support the plank as its fed through the saw. I fed the plank through the saw, using a push stick for the 3/4" edge once I get close to the blade, and standing to the left of the plank in case of kickback. I continued on past the required number of staves because I wasn't sure how many of the staves would be usable. |
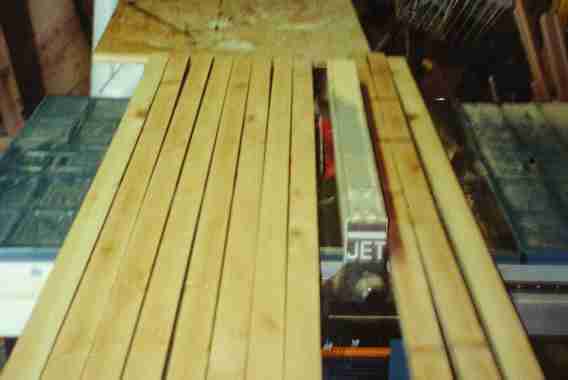 |
The plank yielded 11 strips, with 7 great strips and 4 not so great. I had to select 1 from the not-so- great pile, so I looked closely at them. All had knots, but as luck would have it, one piece was in good shape -- the knot was not loose or cracking across the width of the strip. The other three were weaker where the knot was and couldn't be used. |
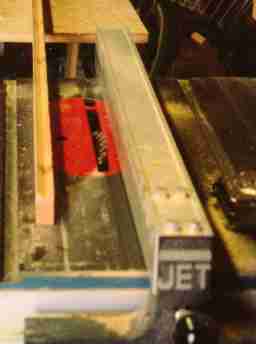 |
The "Bird's Mouth Method" is so named because of the way you cut the staves. For eight staves, you would normally cut a 22.5 degree angle on each side of the stave. In the Bird's Mouth Method, you cut a 45 degree vee along one side, as shown in the photo. Its easier to cut the vee than it is to cut 16 sides of the staves and keep the geometry right. Mark the end of a test stave with a miter square with 45 degree lines from both lower corners, and set the blade to 45 degrees. With the saw off, raise the blade enough so that the first pass will cut just to where the lines intersect. Test by passing the test stave through the saw, then rotate it end for end, and make another pass. Reset the blade until you cut a perfect "bird's mouth" profile in the edge of the stave; too shallow and you end up with a ridge in the bottom, too deep and you have the bottom of your vee flared out. |
 |
Dry fitting the staves together and clamping them, I found the finished
mast too large for the mast box. Each stave was 1 1/2" wide, and
the assembly was 3.75"; just a little too large. I took off an eighth
of an inch, retested, and then did another eighth. (After finishing, it
fits great with a "flat spot" cut along the back side, flattening the stave
there, to lock it in place.)
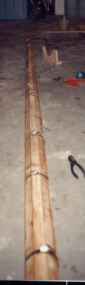
I like the Bird's Mouth Method because it gives more glue surface, and really locks in the pieces for easier clamping. Here, the eight staves have been trimmed to 41", and the best faces are towards me. I mixed up 6 ounces of fast cure epoxy resin and spread it liberally in the vee of each stave. |
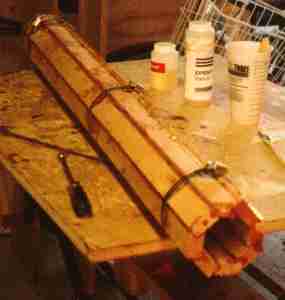 |
The "bird's mouth" edge accepts the square corner of its neighbor, until you have all eight locked together. The 41" staves were not hard to get into place. I think when I do the longer pieces for the top portion, I'll need an assistant. Hose clamps make the perfect clamping system; you tighten them until you start to deform the protruding corners. Because I took care in making the 45 degree "bird's mouth" cuts, the staves fit together nicely, without the gaps that appear in my "proof of concept" test (this is the same link to the test given above.) |
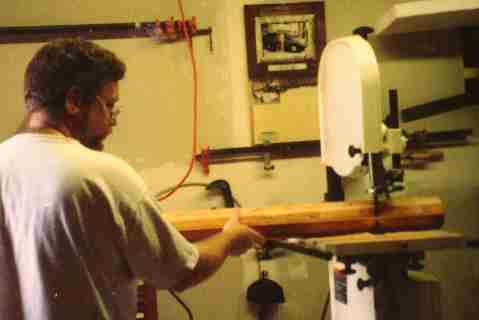 |
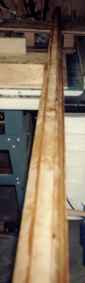
I used my new band saw to carefully cut the protruding corners off, but I think it would be just as easy to use a hand plane. Sanding with 80 grit paper on my random orbital sander, I was able to make this section fairly round. I probably will leave it a little "rustic" looking, rather than make it perfectly round, to fit in with the theme of my Weekender better. |
 |
Updated 5/21/00 I cut the mast staves for the lower portion
quite a while ago, and since then have been researching the gaff rig that
Aslan will be using (see my new pages, The
Gaff Rig Pages, for info.) The big question is whether to taper
the mast or not, and people have had strong opinions about this.
I finally decided to taper it at 1/2 the taper recommended for the square
mast, as the dimensions seemed extreme for a round mast (going from 3.5"
diameter to 2.25" at the top.) This is a mild taper then, to 3" at
the top, which I hope will make the mast look like a traditional tree trunk
mast without the excess weight. I had thought I would just mark off
the taper on the square side of the stave and use another stave, taped
on top of it with foam mounting tape along the taper line. But the
11' 6" staves are flexible, and you have to be careful getting one positioned
correctly on top of the other. So I ended up marking the taper by
marking the end and using the measuring tape as a guide to make a pencil
mark the length of the first stave.
I thought a laminate trimming bit in the router table would be the way to go do the actual tapering, and while it works, it was a LOT of work. Because I'm taking off 1/4" of each stave at the narrow end, the bit tends to dig in and split the stock. After doing two with the router table, futzing around with trying to use the foam tape to mount a stave along the taper line and feed it smoothly into the router bit without it gouging out chunks, I found the easiest way to taper the staves. |
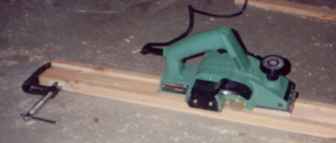 |
My birthday present this year was a power planer, shown in the photo. The absolute easiest way to trim down these staves was to clamp a wider one to some already tapered, and start planing. Very satisfying to have it tapered completely in about 4 minutes, plus you get shavings flying out the side of the thing instead of back at you like the router table. I decided on the power planer to help round the mast, but I'm glad I got it before that point in the project. I think it would have been easier to use it from the beginning: taper the first stave to the mark, then use it to taper the rest of the staves as shown in the photo. Taking 1/16" off at a time, it was easy to get the taper down to the right level. |
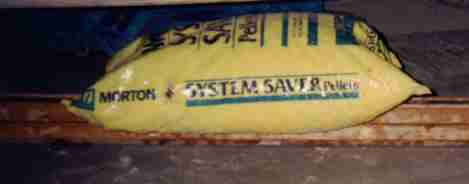 |
Added 6/10/00 For the last week, the mast has been under this 40# bag of water softener salt in an attempt to take out a slight bow. It did not work, so I'll have to shave off some wood during the rounding process to take out the bow. I think the slight bow happened due to allowing the epoxy to cure while the hose clamps at one end had their screws toward the bottom, in effect propping up the end. |
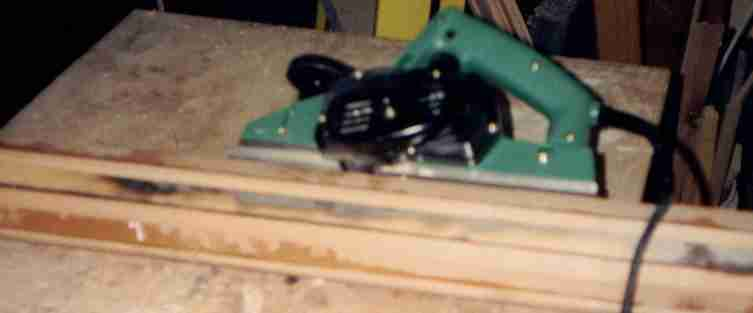 |
Added 6/10/00 The power planer worked great taking down the protruding corners. This Hatachi planer is a fairly inexpensive tool, but so far, its worked well. It does shoot shavings half way across the shop, which pleases cats looking for new pooping spots (read my narrative of trying to sniff out the cat poop after lunch, and not being able to find the offending pile.) I followed up with a low angle block plane, and the mast is nearly round, ready for finish sanding. |
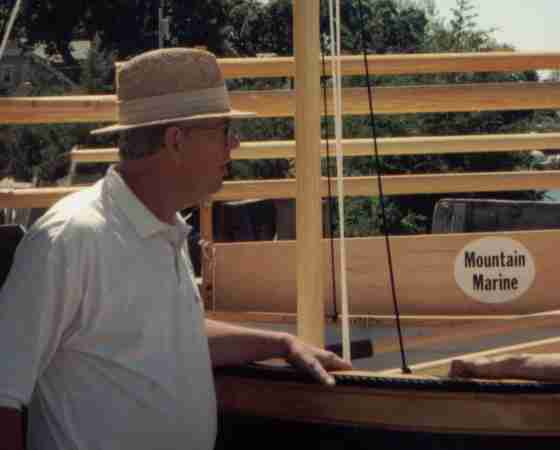 |
Added 6/29/00 The mast is a failure, with a 1" bow in the center. Sigh. Last weekend, I visited the Wooden Boat Show at the Mystic Seaport in CT. Richard Duke, one of the partners at Mountain Marine, the company featured in the Wooden Boat Magazine article about the bird's mouth method of making hollow round masts, was there and I had a chance to talk to him about it. There is a critical part of the process while assembling the staves, and he feels I probably made a mistake here rather than when supporting it as I first thought. If you don't interlock each stave fully in the "bird's mouth," it can cause the mast to twist or bow, as mine has done. He and his partner Craig Wright have failures too, he said, but I don't know if they really do or if he was just being a nice guy (either way, he is a very nice guy.) Mr. Duke has finished his own sailboat and is scheduled to sail away for extended cruising soon. Best of luck to him, and soon, I'll start again on a round mast. |
 |
Added 7/12/00
The failed mast is being re-used. It will be turned down a bit more, and 5' of it utilized for the bowsprit. Here, the rub rails have not been trimmed , so the bowsprit nee-mast failure doesn't lie flat on the stem. But the dimensions are right, so after some work, it will work fine. |
 |
Added 7/12/00
For the new mast, I selected two 2x8 douglas fir "No. 2 or better" at Home Depot that had grain running nearly horizontally across the width when looking at the end of the board. When slices are ripped from the edge, I have "nearly quarter sawn" staves to work with. Because this wood is green, and not dried, I need to work continously through the process; the risk of warp and twist is greater once you rip the lumber into pieces. Gluing the pieces together interlocks them and prevents movement. The new mast will be tapered, from 3 1/2" to 2 1/2", closer to the plan's dimensions. After talking to Mr. Wright, and re-checking the scantlings in the Wooden Boat article, I decide to make the thickness of each stave a thin 7/16". |
 |
Added 7/12/00
The new mast is clamped up at left, rough trimmed at right, and starting to be shaped round at far right. The staves taper from 15/16" wide at one end to 1 5/16" at the other. After ripping the staves to 1 5/16" wide, and cutting the bird's mouth along one edge, I hand tapered the first stave with a power planer and block plane. Then, the tapered stave was used as a "taper jig" for the remaining staves. To do this, I put the narrow end toward the saw first, with the bird's mouth cut along the fence, and placed the bird's mouth cut of the untapered stave against the straight, tapered edge of the first stave. I adjusted the fence so the blade nearly touched the untapered stave. When the saw is started, and both staves pushed through, the increasing width of the first stave pushes the second stave farther to the left, tapering it. I found that if I over-tightened the hose clamps after gluing, I could cause the mast to bow in the middle, especially if the clamp tightening nuts are along the same stave. So the lesson, learned the way I always learn them, is to lock the staves in place (with a helper!), and apply even but not-too-tight clamping pressure. |
 |
 |
More to come as I continue making Aslan's Mast!
|
|
|
|
|
|